10 Easy IKEA Hacks to Make Your Furniture Look Expensive

- 10 Easy IKEA Hacks to Make Your Furniture Look Expensive
- Easy IKEA Hacks: 10 Budget-Friendly Upgrades to Make Your Furniture Look Expensive in 2025
- 📋 Key Takeaways
- Table of Contents
- Why These Easy IKEA Hacks Actually Deliver Results
- The Real Cost Breakdown of Hacking vs. Buying High-End
- Tools and Materials You Actually Need for Easy IKEA Hacks
- The Non-Negotiable Toolkit
- What You Can Definitely Skip
- Hack 1: Replace the Legs on BILLY, KALLAX, and MALM Pieces
- Step-by-Step: Leg Swap for Beginners
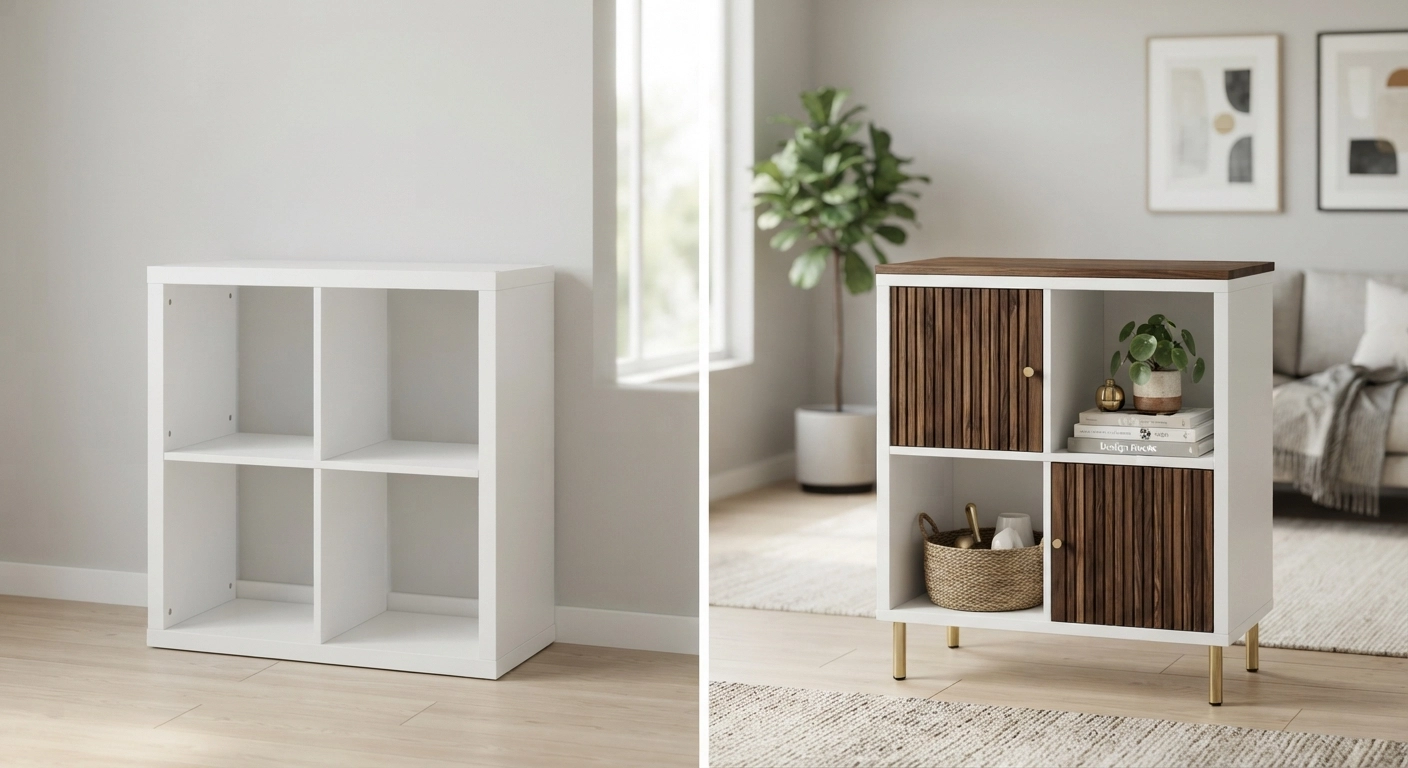
- Hack 2: Add Peel-and-Stick Fluting to Flat Doors and Drawer Fronts
- Where Fluting Works Best
- Hack 3: Gel-Stain IKEA's Laminate to Look Like Real Wood
- Sealing Is Not Optional
- Hack 4: Upgrade Hardware for Instant Luxury
- Where to Find Affordable, High-Impact Hardware
- Hack 5: Wrap IKEA Cabinet Doors with Cane Webbing
- Application Methods: Adhesive vs. Stapling
- Hack 6: Build a Custom Upholstered Bench Using BRYNILEN Legs and LACK Shelf
- Complete Cost Breakdown for the Entryway Bench
- Hack 7: Create a Faux Plaster Finish on IKEA Vases, Lamps, and Side Tables
- Variations That Look Even More Expensive
- Hack 8: Add LED Lighting to Open Shelving for a High-End Display Look
Easy IKEA Hacks: 10 Budget-Friendly Upgrades to Make Your Furniture Look Expensive in 2025
Last weekend, my friend Sarah walked into my living room, pointed at the sleek walnut console table, and said, “No way — that’s IKEA? It looks like a $2,000 piece.” I couldn’t help but grin. Three days earlier, it was a plain white BEKVÄM trolley I’d snagged from the As-Is section for $29. A little frame molding, a coat of gel stain, and two brass handles later, it had transformed into something that anchored the entire room. That’s the magic of easy ikea hacks — they don’t require a workshop full of tools or a degree in fine carpentry.
I’ve been hacking IKEA furniture for close to six years now. Some projects have turned out so well that guests assumed they were custom-made, while others… well, let’s just say I’ve learned what not to do. The approaches I’m sharing below have survived dozens of trial runs, apartment moves, and even a few clumsy roommate incidents. The common thread? They’re genuinely easy ikea hacks — projects you can complete in a single weekend without losing your mind (or your security deposit). Whether you want to upgrade a KALLAX, transform a dresser, or make a basic MALM bed frame look bespoke, these ten ideas will help you achieve that high-end aesthetic for shockingly little money.
📋 Key Takeaways
- Most easy ikea hacks focus on three upgrades: hardware, legs, and surface finishes — swapping these three elements alone can make a $79 piece look custom-built.
- Prep work matters more than technique; sanding, priming, and cleaning surfaces properly prevents peeling and chipping six months down the road.
- You don’t need power tools for many projects — adhesive films, peel-and-stick tiles, and screw-on legs can be applied with basic household items.
- The As-Is section and Facebook Marketplace are gold mines for hack bases, often supplying the same KALLAX or LACK tables at 40-70% off retail.
- Gel stains outperform traditional penetrating stains on IKEA’s laminate surfaces, giving a realistic wood look without stripping the factory finish.
Table of Contents
- Why Easy IKEA Hacks Work So Well
- Tools and Materials You Actually Need
- Hack 1: Replace the Legs on Any Piece
- Hack 2: Add Peel-and-Stick Fluting
- Hack 3: Gel-Stain Laminate to Look Like Wood
- Hack 4: Upgrade Hardware for Instant Luxury
- Hack 5: Wrap with Cane Webbing
- Hack 6: Build a Custom Bench with BRYNILEN Legs
- Hack 7: Create a Faux Plaster Finish
- Hack 8: Add LED Lighting to Open Shelving
- Hack 9: Apply Decorative Molding to Flat Doors
- Hack 10: Turn a RAST Dresser into a Nightstand Duo
- Frequently Asked Questions About Easy IKEA Hacks
- Ready to Hack Your First Piece?
Why These Easy IKEA Hacks Actually Deliver Results
IKEA furniture is designed with modularity in mind — standard screw sizes, consistent material thickness, and parts that are sold separately. That design philosophy, originally intended to simplify manufacturing, accidentally created one of the most hackable product ecosystems on the planet. When you buy a KALLAX shelf unit, you’re not just buying shelves — you’re buying a set of standardized panels that third-party manufacturers have built entire accessory lines around. Pretty Nifty, a brand we’ve tested extensively, makes fluted door inserts that clip directly onto KALLAX frames without drilling. The result looks like custom millwork but installs in under ten minutes.
In my experience, the most effective easy ikea hacks exploit three weak points that make mass-produced furniture look cheap: hollow-sounding panels, generic hardware, and flat, featureless surfaces. Addressing even two of these transforms the perceived value of a piece. A $69 LACK coffee table becomes unrecognizable with four $12 tapered legs and a walnut contact paper top. I’ve done exactly this for three different apartments now, and each time, someone has asked where I got the “vintage walnut” table from. The supply chain at IKEA also means components stay available for years — I can still buy the same KALLAX unit I hacked in 2019 and repeat the project identically.
The Real Cost Breakdown of Hacking vs. Buying High-End
One of the biggest misconceptions I encounter is that hacking IKEA furniture ends up costing as much as buying a mid-range piece from a competing brand. Let’s look at the numbers from a recent project: I transformed two IVAR cabinets into a media console. The cabinets cost $140 total, the cane webbing ran $25, the brass legs were $38, and the stain plus sealer was another $18. That’s $221 for a console that, custom-made, would run $800-1,200. And it took me a single Saturday. Compare that to the equivalent West Elm console at $699, and you’re looking at roughly 68% savings.
If you’re exploring ways to fund more ambitious DIY projects, we’ve put together a detailed breakdown of DIY crafts you can make and sell to turn your newfound hacking skills into a side income stream. Many of the techniques you’ll learn below — like applying cane webbing or refinishing laminate — translate directly into products people will happily pay for on Etsy or at local markets.
Tools and Materials You Actually Need for Easy IKEA Hacks

You don’t need a garage full of power tools. Over six years of hacking, I’ve found that 90% of projects rely on the same small kit. Here’s what’s genuinely essential and what you can skip.
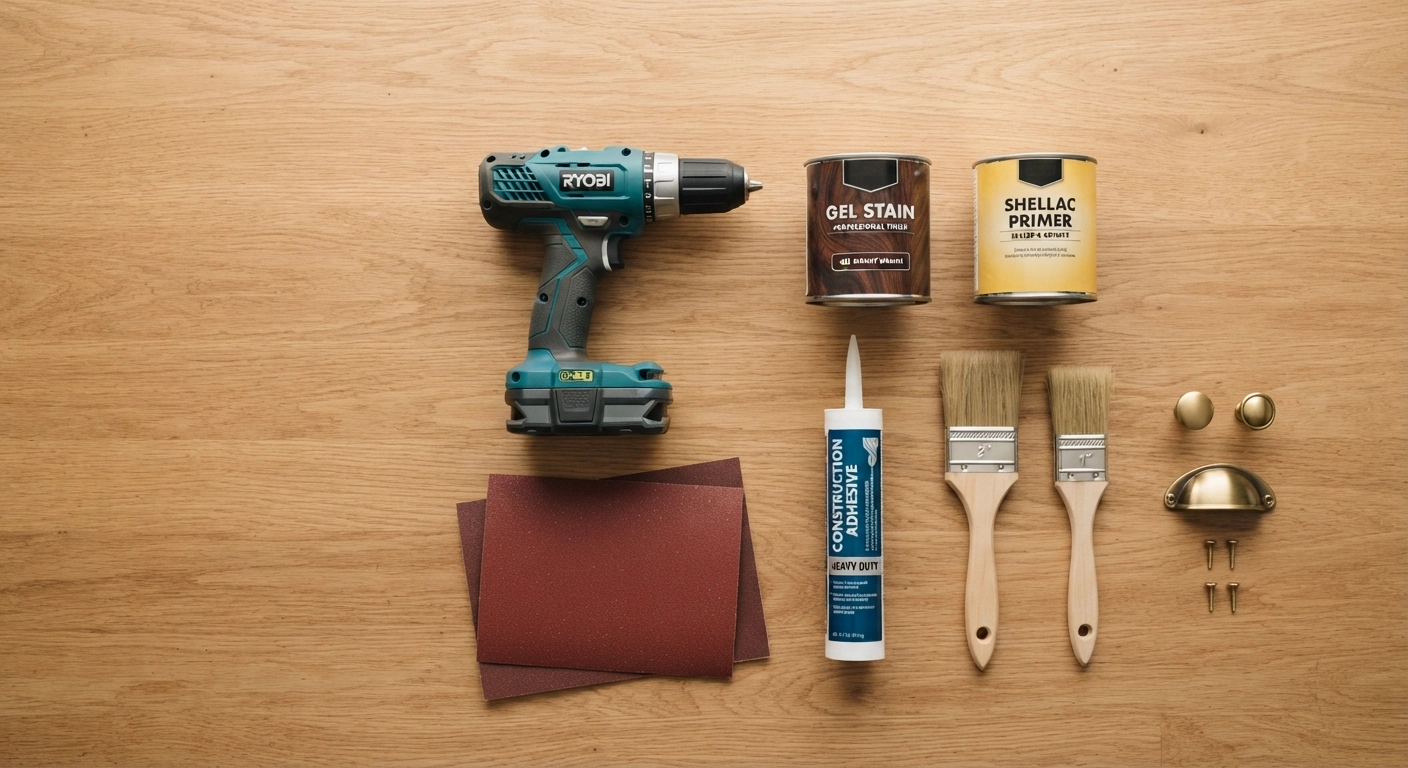
The Non-Negotiable Toolkit
- Cordless drill with a clutch setting — You’ll use this for pilot holes and driving screws. The clutch prevents you from stripping IKEA’s particleboard, which is the #1 mistake beginners make. A $40 Black+Decker model handles everything in this guide perfectly.
- 120- and 220-grit sandpaper — IKEA surfaces are coated with a thin laminate or acrylic lacquer. 120-grit scuffs it enough for primer or adhesive to grip; 220-grit smooths any filler or edge work.
- Quality primer (shellac-based, like Zinsser BIN) — Water-based primers can swell particleboard edges. Shellac-based primer dries in 20 minutes and seals the surface permanently. It’s the single product that made my early hacks stop peeling.
- Gel stain (General Finishes or Minwax) — Unlike penetrating stain that requires raw wood, gel stain sits on top of the surface and can be applied directly to scuffed laminate. It’s the secret weapon behind 90% of the wood-look IKEA hacks you see on Pinterest.
- Construction adhesive (Loctite Power Grab) — For attaching molding, trim, or decorative panels to smooth IKEA surfaces where mechanical fasteners would split the material.
What You Can Definitely Skip
I bought a brad nailer three years ago thinking it’d change my hack game. I’ve used it exactly twice. Same goes for a router, a jigsaw (unless you’re doing curved cuts, which none of these ten projects require), and expensive foam rollers — a cheap microfiber roller from the dollar store applies gel stain just as evenly. Don’t let tool intimidation stop you from starting; these easy ikea hacks are designed around what you already have in your junk drawer.
Learning to work with affordable, accessible materials is a skill that extends well beyond furniture hacking. If you enjoy the process of transforming basic supplies into something beautiful, you might also love our guide on how to make easy scented candles — it’s another low-cost, high-impact DIY that uses techniques very similar to what you’ll practice here.
Hack 1: Replace the Legs on BILLY, KALLAX, and MALM Pieces
The single highest-impact change you can make to any IKEA furniture is swapping the legs. IKEA’s default legs are almost always short, chunky, and made of either pale pine or black plastic — both of which scream “flat-pack.” Swapping in tapered wood legs, hairpin legs, or turned brass feet instantly lifts the piece and creates visual breathing room underneath. This hack takes under 30 minutes and requires zero experience.
Most IKEA products use a standard M8 (8mm) threaded insert for leg attachment. Companies like Pretty Pegs, Nordic Knots, and even Amazon sellers produce legs specifically designed to fit these inserts. I’ve used Pretty Pegs’ 8-inch walnut tapered legs on three separate projects — two BILLY bookcases and a KALLAX unit — and each time, the furniture looked like it had gained $300 in perceived value. The key measurement: check the thread size (almost always M8) and the height you want. Going from a 4-inch leg to an 8-inch leg also makes vacuuming underneath dramatically easier, which is a practical win I appreciate every week.
Step-by-Step: Leg Swap for Beginners
- Tip the piece onto its side on a soft surface (a folded blanket works perfectly).
- Unscrew the existing legs counterclockwise. If they’re tight, a pair of pliers with a cloth wrapped around the leg prevents scratching.
- Check the threaded insert in the base — if it’s loose, add a drop of wood glue around it and let it dry for 20 minutes.
- Screw the new legs in hand-tight, then give them a quarter turn more with a wrench wrapped in cloth.
- Flip the piece upright and check for wobble; most new legs include adjustable leveling feet for fine-tuning.
Pro tip from my own failures: If you’re adding significantly taller legs (10 inches or more), the furniture’s center of gravity shifts upward. Address this by adding weight to the bottom shelf — a stack of heavy books or a decorative basket filled with blankets — or use the included wall-anchoring bracket IKEA provides. I learned this the hard way when my first hacked KALLAX tipped forward during a late-night cat zoomies incident. No damage, but my cat looked very smug about it.
Hack 2: Add Peel-and-Stick Fluting to Flat Doors and Drawer Fronts
Fluted or reeded detailing is everywhere in high-end furniture right now — and it’s surprisingly easy to replicate on flat IKEA surfaces. Actual fluted wood panels cost a fortune and require custom milling. But companies now manufacture peel-and-stick fluted MDF sheets that you can cut with a utility knife and apply directly to drawer fronts, cabinet doors, or side panels. This is one of those easy ikea hacks that looks so professional it feels like cheating.
I first tested this on a HEMNES dresser whose drawer fronts had accumulated a few scratches. I bought two 24″ x 48″ fluted panels from a supplier on Etsy (total cost: $44), cut them to size with a straight edge and a fresh utility knife blade, and adhered them using the pre-applied adhesive backing. The result was a dresser that looked like it belonged in a high-end boutique hotel. The vertical lines draw the eye upward, making the piece feel taller and more architectural. Material costs for this transformation: under $60. Time required: about three hours, most of which was measuring and cutting precisely.
Where Fluting Works Best
- Drawer fronts on HEMNES, MALM, and TARVA dressers — Apply to the entire front for a uniform look, or create a bordered effect by leaving a 1-inch margin around the edges.
- Side panels of KALLAX units — Fluting on the exterior sides transforms a basic shelving cube into a statement piece.
- BILLY bookcase doors — Replace the standard flat doors with fluted panels for a custom-built-in appearance.
- BESTA media console fronts — Combine fluted doors with brass hardware (see Hack 4) for a console that rivals anything from a designer furniture store.
The one caution I’ll share: measure twice, cut once. Fluted panels have a directional grain pattern, so if you cut a piece upside down relative to its neighbor, the fluting won’t align. Mark the back of each panel with an arrow indicating “up” before you cut. And when you’re aligning multiple pieces on drawer fronts, use spacers (pennies work perfectly) to maintain consistent gaps. Nothing screams “DIY” louder than uneven spacing.
Hack 3: Gel-Stain IKEA’s Laminate to Look Like Real Wood
Gel stain is the single product that has saved more IKEA furniture from landfill than any other DIY material. Unlike traditional penetrating stain that soaks into wood pores, gel stain is a thick, paint-like coating that sits on the surface and dries to a translucent finish. This means it works on laminate, veneer, and even metal — basically every surface IKEA uses. I’ve used General Finishes gel stain in “Antique Walnut” on four different projects, and each time, people have touched the surface expecting real wood grain. The technique here matters a lot more than the product choice.
Here’s the process I’ve refined through trial and error: First, scuff the entire surface with 220-grit sandpaper — you’re not removing the laminate, just creating microscopic scratches for the stain to grip. Wipe away all dust with a tack cloth (seriously, don’t skip this; dust particles create bumpy texture in the final finish). Apply gel stain in thin, even coats using a foam brush or a microfiber cloth, working in the direction of the “grain” you want to create. I drag the cloth in long, straight passes to create subtle streaking that mimics wood. Let each coat dry for 24 hours — impatience here causes the sticky, never-drying mess that ruined my first attempt. Three thin coats achieve the depth you see in my projects.
Sealing Is Not Optional
Gel stain without a topcoat will scratch and wear within weeks, especially on horizontal surfaces like tabletops. After the final stain coat dries completely (give it 48 hours to be safe), apply two coats of water-based polyurethane in a satin or matte sheen. I prefer Varathane’s water-based poly because it doesn’t amber over time — oil-based poly can turn white laminate slightly yellow, which ruins the “real wood” illusion. Lightly sand with 320-grit between coats. The finish will feel silky smooth and resist water rings from coffee cups. My gel-stained LACK coffee table has survived two years of daily use, including a red wine spill, and still looks pristine.
For those interested in exploring more wood-finishing projects, our guide on woodworking projects that sell covers beginner-friendly builds that pair beautifully with the finishing techniques you’re learning here.
Hack 4: Upgrade Hardware for Instant Luxury
This is the quickest win on the entire list, yet so many people overlook it. IKEA’s included hardware — knobs, pulls, and handles — is functional but generic. Swapping in unlacquered brass, matte black, or brushed nickel hardware takes about ten minutes and costs $20-40 for an entire dresser’s worth. I keep a box of assorted knobs from Etsy and Rejuvenation specifically for this purpose; when I bring home a new IKEA piece, the default hardware comes off before I even assemble the rest. It’s that transformative.
The critical measurement: center-to-center hole spacing on pulls. IKEA’s pre-drilled holes are typically 96mm, 128mm, or 160mm apart. Before ordering new pulls, measure the distance between screw holes on your existing hardware. If you can’t find exact matches, buy pulls with the next size down and use the included screws — the slight tension actually helps keep them aligned. For knobs, the only consideration is the screw length; most IKEA drawer fronts are 16mm thick, so standard 1-inch screws fit perfectly. Unlacquered brass is my personal favorite because it develops a patina over time, actually looking better and more “authentic vintage” the longer you own it.
Where to Find Affordable, High-Impact Hardware
- Etsy — Search for “unlacquered brass cabinet pulls” or “handmade ceramic knobs.” Small-batch makers often sell sets of 10 for $25-35, and the uniqueness factor adds to the custom-built illusion.
- Rejuvenation — Their sale section frequently has pulls at 40-50% off; quality is exceptional but still an investment at $8-15 per pull. Reserve this for pieces you’ll keep long-term.
- Amazon — The brand “Ravinte” makes surprisingly solid stainless steel pulls in matte black and brushed brass finishes. I’ve used their 5-inch pulls on three projects without any finish wearing off.
- Habitat for Humanity ReStore — Absolute gold mine for vintage hardware. I once found a set of 12 solid brass pulls from a 1960s kitchen remodel for $15. Patience and frequent visits pay off enormously.
Hack 5: Wrap IKEA Cabinet Doors with Cane Webbing
Cane webbing has become the unofficial texture of high-end furniture design, appearing everywhere from Serena & Lily nightstands to Anthropologie media consoles. Applying it to IKEA cabinet doors is easier than it looks and produces results that genuinely appear custom-made. The material itself is shockingly affordable — a 24″ x 36″ roll of natural cane webbing costs about $15 on Amazon and covers two standard HEMNES drawer fronts.
I discovered this technique when trying to salvage a water-damaged IVAR cabinet. The bottom door had swollen at the edge from a plumbing incident (long story involving a houseplant and an overenthusiastic watering can). Rather than replace the door, I cut a piece of cane webbing slightly larger than the door’s center panel, applied a bead of construction adhesive around the inner edge of the door frame, and pressed the webbing in place. I used spring clamps to hold it while the adhesive cured, then trimmed the excess with sharp scissors. The result covered the damage completely and looked intentional — like a design feature I’d planned all along. This is one of those easy ikea hacks that draws the most compliments from guests because cane webbing is so strongly associated with expensive furniture.
Application Methods: Adhesive vs. Stapling
I’ve tested both methods, and each has its place. Construction adhesive (Loctite Power Grab) creates the cleanest look because there are no visible fasteners, but it requires 24 hours of clamping time and some patience. Stapling with a manual staple gun is faster and allows you to tension the cane webbing more tightly, but the staples are visible inside the door — fine for cabinets you access, less ideal for display furniture with glass fronts. For most projects, I recommend adhesive on the front and staples on the back edge as a backup, trimmed with small pieces of fabric tape so they don’t catch on anything inside the cabinet.
Important note about cane webbing: It expands slightly when wet and contracts when dry. Always soak it in warm water for 20 minutes before application, then let it dry in place — this pre-shrinks the material so it won’t sag later. I skipped this step on my first attempt and ended up with a wavy, loose-weave mess after a humid summer. Learn from my mistake.
Hack 6: Build a Custom Upholstered Bench Using BRYNILEN Legs and LACK Shelf
This project turns two unlikely IKEA items into an upholstered bench that could sell for $400-600 at a home décor boutique. The base is a LACK wall shelf (the 43-inch version, $29.99), and the legs are four BRYNILEN bed legs ($10 for a set of four). Combined with foam padding and your choice of fabric, the materials total under $80. I’ve built three of these — one for my entryway, one as a gift for my sister, and one that sits at the foot of my bed. Each took roughly three hours from start to finish.
The genius of using a LACK shelf as the seat base is that it’s pre-laminated, dead flat, and incredibly rigid for its weight. It also has pre-drilled holes for mounting hardware that conveniently align with standard leg plates. The BRYNILEN legs screw directly into these plates with minor modification — you’ll need to widen the holes slightly with a drill bit, but it’s a five-minute adjustment. For the upholstery, I use 2-inch high-density foam (Joann Fabrics carries it, or you can order custom-cut sizes online), wrapped in batting for smooth edges, then covered with a staple gun. Choose performance velvet or a tightly woven linen blend — both wear well and hide the occasional coffee spill.
Complete Cost Breakdown for the Entryway Bench
| Component | Source | Cost |
|---|---|---|
| LACK wall shelf, 43″ | IKEA | $29.99 |
| BRYNILEN legs (set of 4) | IKEA | $10.00 |
| 2″ high-density foam, 42″x13″ | Joann Fabrics | $18.00 |
| Polyester batting | Joann Fabrics | $6.00 |
| 1.5 yards performance velvet fabric | Online Fabric Store | $16.50 |
| Total | $80.49 |
Compare that to the West Elm “Emmerson” entryway bench at $499, and you’ve saved over $400 while building something uniquely yours. If you’re interested in turning furniture-making skills into income, check out our guide on DIY crafts to make and sell — benches like this one consistently rank among the most profitable beginner projects.
Hack 7: Create a Faux Plaster Finish on IKEA Vases, Lamps, and Side Tables
Plaster and travertine finishes are dominating interior design right now, but authentic plaster furniture costs a small fortune. The good news: you can fake this look convincingly using joint compound and paint, and it works on everything from IKEA’s ceramic vases to their metal desk lamps and particleboard side tables. The finish is tactile, matte, and looks remarkably like the $300+ plaster objects at design stores. I’ve done this to a FADO table lamp ($24.99) and a set of CYLINDER vases ($9.99 each), and they now look like they came from a gallery in Athens.
The technique is easier than you think. Mix a small amount of all-purpose joint compound with a few drops of water until it reaches a thick, frosting-like consistency. Using a chip brush or an old credit card, apply the compound in random, overlapping strokes — you’re not aiming for smoothness; you want texture. Let it dry for an hour, then gently sand any sharp peaks with 220-grit sandpaper. Prime with a flat spray primer, and then paint with a matte acrylic in a warm stone tone (I use Behr’s “Mushroom” or “Pebble”). A final dry-brush pass with a slightly lighter shade of paint highlights the high points of the texture, creating depth. The total material cost for this transformation is under $15.
Variations That Look Even More Expensive
Once you master the basic plaster finish, try these variations to push the look even further into high-end territory. Adding a wash of watered-down dark brown paint, immediately wiped off with a cloth, settles into the low points and mimics the aged patina of genuine travertine. For a limewash effect, use a large brush to apply thin, streaky layers of paint in two slightly different tones, letting the original surface peek through. And if you want the piece to literally feel like stone, mix fine sand (available at craft stores, $3 a bag) into your joint compound — the resulting texture is gritty and cool to the touch, indistinguishable from cast concrete.
This technique pairs beautifully with items you might already have at home. I’d love to see how a faux-plaster-finished lamp sits next to a cozy, handmade chunky knit blanket — the contrast of textures adds so much warmth and sophistication to a space without the matching-furniture-set look that dates rooms so quickly.
Hack 8: Add LED Lighting to Open Shelving for a High-End Display Look
Nothing signals “expensive” like integrated lighting — and with today’s peel-and-stick LED strips, adding illumination to IKEA shelving is a genuinely easy project. I’ve added warm-white LED strips to the underside of each shelf in my KALLAX room divider, and at night, the soft glow transforms the entire room. The shelves look like they cost ten times what I paid, and the lighting highlights the objects displayed on them far better than any overhead fixture ever could.
I recommend using LED strip lights with a color temperature of 2700K-3000K (warm white) and a high CRI (Color Rendering Index) of 90 or above. Cheap LEDs with low CRI make colors look washed out and flat; high-CRI strips render reds, woods, and artwork accurately, which is exactly what you want when you’re illuminating decor. The brand “Govee” sells Wi-Fi-enabled strips that cut to length and include adhesive backing — I’ve used these in three rooms now. For a KALLAX unit, run the strip along the front underside of each shelf, using the included plastic mounting