How to Make Easy Resin Jewelry for Beginners

- How to Make Easy Resin Jewelry for Beginners
- 📋 Key Takeaways
- Table of Contents
- Resin Safety for Beginners: The Non-Negotiable First Step
- What Exactly Makes Resin Fumes Dangerous?
- Your Minimal Safety Checklist for 2026
- Essential Supplies for Your First Resin Jewelry Kit
- Building a $50 Starter Kit
- Mastering the Mix: The Secret to Bubble-Free Hardener
- The 1:1 Ratio Mirage
- Stirring Like a Pro
- Pouring and Embellishing: Adding Flowers, Glitter, and Gold
- The Base Layer: Preventing Floaters
- Embedding Flowers and Foils
- The 24-Hour Cure: Patience Pays Off
- How to Build a Dust-Proof Curing Box
- The Tacky 12-Hour Mark
- Demolding and Finishing: From Cloudy to Crystal Clear
- Sanding Out Imperfections
- The Magic Top Coat (Doming)
- Turning Your Hobby into Profit in 2026
- Pricing Your Work
- Where to Sell
- Frequently Asked Questions
- How do I make resin jewelry for the first time without any experience?
- What is the difference between UV resin and epoxy resin for jewelry making?
- Why did my resin jewelry turn out sticky or bendable after 24 hours?
- Can I add fresh flowers directly into my resin jewelry molds?
- Is making resin jewelry safe to do inside an apartment without a dedicated studio?
- How much money does it actually take to start making resin jewelry?
- 🔗 İlgili İçerikler
I still remember the exact moment my friend pulled a cloudy, sticky mess from a silicone mold—her first attempt at resin jewelry. She was ready to throw the whole kit into the trash. “It looked so easy on Instagram!” she groaned. The problem wasn’t a lack of talent; the instructions she’d followed missed the three non-negotiable rules that separate a glass-like professional finish from a tacky disaster. If you’ve ever felt that sting of creative disappointment, take a deep breath. Learning how to make easy resin jewelry is simpler than you think once you understand the science hiding beneath the shiny surface. In this 2026 guide, we’ve tested dozens of brands and techniques (and yes, ruined a few batches along the way) to give you the definitive roadmap to flawless results on your very first day.
Unlike painting or knitting, resin is a chemical process disguised as an art form. That’s the secret. Ignore the chemistry pay attention only to the colors, and you’ll end up with soft bends and sticky surfaces. But treat the mixing process like a simplified science experiment—measuring precisely, stirring slowly, and respecting the cure time—and you’ll unlock jewelry that looks like it came straight from a boutique. This isn’t just a craft; it’s a gateway to a relaxing hobby that can even become a profitable side hustle.
📋 Key Takeaways
- The 1:1 mixing ratio by volume (not weight) is the single most critical step for how to make easy resin jewelry that hardens properly.
- Safety gear isn’t optional—a respirator rated for organic vapors and nitrile gloves are the bare minimum for working with epoxy fumes in 2026.
- Bubble annihilation is a two-stage process: slow stirring prevents them, and a heat gun eliminates the survivors before curing.
- Waiting the full 24-hour cure time (in a dust-free box) separates the amateurs from the pros.
- You can kit yourself out for under $50, making this one of the cheapest hobbies to start.

Table of Contents
- Resin Safety for Beginners: The Non-Negotiable First Step
- Essential Supplies for Your First Resin Jewelry Kit
- Mastering the Mix: The Secret to Bubble-Free Hardener
- Pouring and Embellishing: Adding Flowers, Glitter, and Gold
- The 24-Hour Cure: Patience Pays Off
- Demolding and Finishing: From Cloudy to Crystal Clear
- Turning Your Hobby into Profit in 2026
- Frequently Asked Questions
Resin Safety for Beginners: The Non-Negotiable First Step
Walk into any resin crafting group on social media, and you’ll see a heated debate about safety that catches most beginners off guard. Here is the unfiltered truth: epoxy resin is safe to handle, but the fumes released during the chemical reaction are toxic when inhaled in large concentrations over time. We learned this the hard way during a weekend binge-making earrings in a closed room; a headache knocked us out for hours.
What Exactly Makes Resin Fumes Dangerous?
The two-part epoxy system you’ll use works by a chemical reaction between a resin and a hardener. During this exothermic reaction, volatile organic compounds (VOCs) are released into the air. According to a study on occupational exposure (National Institutes of Health), unventilated exposure can lead to respiratory sensitization and allergic contact dermatitis. This doesn’t mean you need a hazmat suit, but it does mean you can’t craft in a closed bedroom.
Your Minimal Safety Checklist for 2026
You don’t need a professional lab, but you do need these three things:
- Respirator Mask: Not a paper dust mask. You need a half-face respirator rated for organic vapors (like the ones found in the painting section of hardware stores). We use an OV/P95 rated cartridge mask.
- Nitrile Gloves: Latex gloves melt against resin. Nitrile provides a chemical-resistant barrier. Change them if you notice any sticky transfer.
- Cross-Ventilation: Open two windows on opposite sides of the room. A small fan blowing out the window creates a negative pressure that sucks fumes away from you.
- Eye Protection: Safety glasses stop splashes (and flying bits during sanding).
Ignoring ventilation is the number one reason people give up on resin. Set up your station near a window, or if you’re getting serious, consider building a simple indoor grow tent with an inline duct fan to vent fumes directly outside.
Essential Supplies for Your First Resin Jewelry Kit
Stepping into a craft store aisle for resin supplies can feel overwhelming. Between the two-part epoxies, UV resins, deep pour formulas, and coating resins, it’s easy to grab the wrong bottle. For how to make easy resin jewelry, you need a casting epoxy specifically designed for small pours.
| Supply Category | Beginner Recommendation | Why You Can’t Skip It |
|---|---|---|
| Resin Type | Casting Epoxy (1:1 by volume) | Art resin or coating resin is too thin; it will warp and wrinkle in deep molds. A 1:1 ratio is foolproof to measure. |
| Silicone Molds | High-quality platinum silicone | Flush-cutters finish the job that cheap scissors can’t, preventing frayed wires that tangle inside the panel. |
| Heat Source | Manual hand pump power strip | Cheap tin molds or latex molds release chemicals that inhibit the surface cure of epoxy, leaving a permanent sticky layer. |
Building a $50 Starter Kit
Here’s a budget blueprint that gets you everything without buying wasteful “starter kits” full of things you won’t use:
- Epoxy Kit (16oz): Look for a kit that states “low viscosity” and “long working time” (30-45 minutes). (Approx. $20).
- Mold Set: A set of 10-15 jewelry molds (earrings, pendants, rings). (Approx. $10).
- Silicone Measuring Cups: Get a pack of 5 (50ml size). These are reusable if you let the leftover resin harden inside and pop it out. (Approx. $8).
- Jewelry Findings: Blank bezel trays, earring hooks, and jump rings in gold or silver finish. (Approx. $10).
You already have a heat gun? Great. If not, a long-neck barbecue lighter works for popping surface bubbles in a pinch. Don’t blow through a straw; the moisture in your breath will cloud the resin.
Mastering the Mix: The Secret to Bubble-Free Hardener
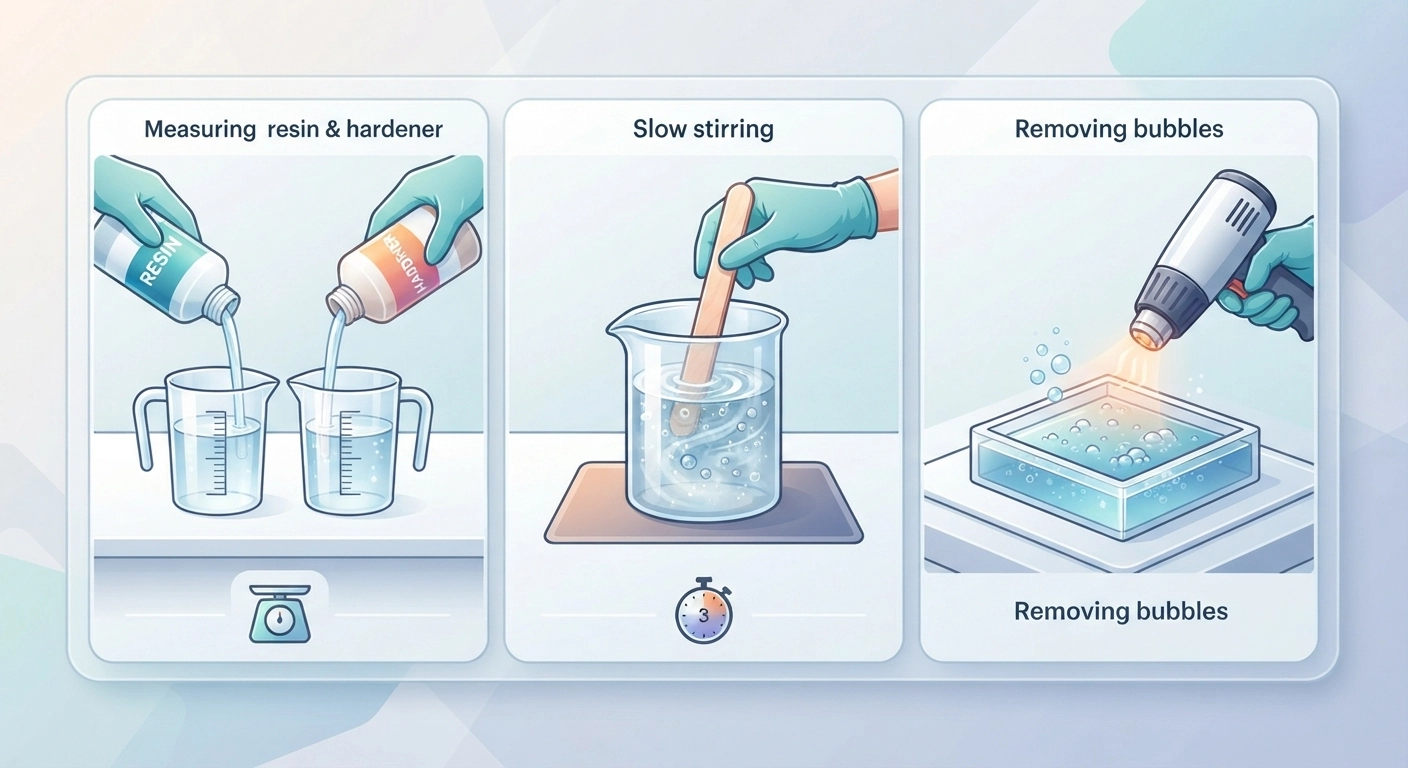
You’ve laid out your newspaper, strapped on your respirator, and measured your resin. Now comes the moment that predicts success or failure. If you only remember one technical step regarding how to make easy resin jewelry, let it be this: scrape the sides and the bottom of the cup constantly.
The 1:1 Ratio Mirage
Follow the bottle’s instructions. If it says measure by volume, use identical measuring cups side-by-side to ensure the meniscus (the curve at the top of the liquid) matches. Don’t assume pouring “roughly equal” squirts works. A 5% margin of error is enough to make the piece bendy. Pour the hardener into the resin, not the other way around.
Stirring Like a Pro
Set a timer for 3 minutes. Stir slowly. Stirring fast whips in oxygen and creates a blizzard of micro-bubbles. Use a flat silicone stick or a wide wooden craft stick. Scrape the sides every 15 seconds. After the timer goes off, transfer the mixed epoxy into a second clean cup and stir for another minute with a new stick. This “double-cup method” eliminates the unmixed streaks clinging to the sides and bottom that cause sticky spots.
Let the mixture sit for 5 minutes. You’ll see bubbles rise to the surface and pop naturally due to the exothermic heat. After the wait, you’re ready to pour the clearest batch of resin you’ve ever mixed.
Pouring and Embellishing: Adding Flowers, Glitter, and Gold
This is where science transitions into art. Your molds are level on the table. The resin looks like liquid glass. Now you layer the magic.
The Base Layer: Preventing Floaters
Don’t dump your dried flowers straight into an empty mold. Pour a shallow base layer (about 1/3 of the mold’s depth) first. Let this sit for 10-15 minutes until it thickens to a honey-like consistency. If you drop dried petals into watery resin, they float to the top the moment you look away. By letting the layer gel slightly, you create a cushion for your botanicals to sit inside the jewelry rather than sticking out of the surface.
Embedding Flowers and Foils
Use a toothpick or a silicone-tipped tool to gently push inclusions into the gel layer.
- Dried Flowers: They must be 100% bone-dry. A flower with 1% moisture will rot inside the resin and turn brown or release water that clouds the cure.
- Metal Leaf Flakes: Gold or silver leaf adds an elegant minimalist aesthetic that catches the light. Tear off tiny bits and swirl them with a toothpick.
- Glitter & Mica: Mix a pinch of mica powder into a separate small cup of resin for an opaque, marble-like color. Biodegradable glitter is better for the environment and behaves the same.
After placing your elements, you can top off the mold with the remaining resin, filling it until the surface tension creates a slight dome above the edge (this counteracts the shrinkage that happens during curing). Pop any remaining bubbles with a quick wave of the heat gun half a foot above the surface.
The 24-Hour Cure: Patience Pays Off
You’ve just poured liquid ambition into a mold, and now you want to poke it. Stop. The curing process is a thermal runaway reaction; disturbing it introduces dust, insects, and cat hair into the sticky surface.
How to Build a Dust-Proof Curing Box
Environmental dust is the silent killer of a glassy finish. The easiest solution? A clear plastic storage bin turned upside down over your molds. Or, use a disposable aluminum baking pan with a sheet of wax paper taped over the top. It creates a mini greenhouse that lets air in for the chemical reaction but keeps floating particulates out. If you’re working in a cold garage (< 70°F), the resin will stay syrupy for days and never harden. Place the covered mold on a seed starting heat mat set to low (75-80°F). According to the resin chemistry data sheets, a 10°C drop can double the cure time.
The Tacky 12-Hour Mark
Some “quick-cure” resins claim demolding in 12 hours, but “demolding” and “full cure” are different. A piece might be solid enough to pop out but soft enough to fingerprint. For jewelry that needs to hang on an earlobe without warping, wait the full 24-hour hard cure before handling. Set the timer on your phone, go work on another profitable DIY craft, and forget about it.
Demolding and Finishing: From Cloudy to Crystal Clear
The timer goes off. You lift the box, hold your breath, and flex the silicone mold. The piece drops into your hand. If it’s a high-quality platinum silicone mold, the surface will look wet and glossy. If it’s a cheap mold, it might look cloudy or have a matte texture. Don’t worry—finishing is where the real magic happens.
Sanding Out Imperfections
Flashing (the thin, sharp edge of resin that crept up the side of the mold) is normal. Cut it away with a craft knife. For scratches on a matte piece, you’ll need wet/dry sandpaper. Start with a 400 grit to round the edges, move to 800, then 1500, and finally 3000 grit. Always sand wet; the water lubricates the sandpaper and traps the fine resin dust, which you shouldn’t inhale. The piece will look completely frosted after sanding. That’s correct.
The Magic Top Coat (Doming)
To bring back the glass transparency, you apply a “dome” layer. Mix a tiny, fresh 10ml batch of the same epoxy. Place your sanded piece on a silicone mat, and drip the resin onto the top surface. Use a toothpick to spread it gently over the edges, allowing gravity to pull it down the sides. The surface tension will self-level into a flawless lens. Cover the piece again and let it cure for another 24 hours. The difference is night and day; that $5 piece now looks like a $50 artisan product. This is the exact technique we used to share for making custom vinyl decals look professionally sealed, but with a much glossier finish.
To finalize, attach your jewelry findings. Use a pin vise (a tiny hand drill) to bore a small hole for a jump ring if the mold didn’t include one. Secure the jump ring with flat-nose pliers, thread an earring hook, and step back to admire.
Turning Your Hobby into Profit in 2026
Once you’ve mastered how to make easy resin jewelry, you’ll notice friends and family asking, “Can you make me a set?” The demand for handmade, small-batch accessories remains massive this year, especially for personalized items containing birth flowers or zodiac elements.
Pricing Your Work
Don’t undervalue the time. A pair of earrings isn’t just the $0.50 of resin used. Calculate the sanding, the doming, the photography, and the listing fees. A simple formula: (Materials + Packaging) x 4 = Wholesale Price. Wholesale x 2 = Retail Price. A pair of floral stud earrings that costs $2 in consumables might have a $8 wholesale price and a $16 retail tag. That’s the standard markup that makes a craft business viable.
Where to Sell
Resin jewelry thrives in visual marketplaces. If you’re unsure where to set up shop, check out our brutally honest comparison of Etsy vs Shopify. Etsy’s search traffic is gold for “custom resin necklace” keywords, while Shopify gives you brand control. Or, dive into the most profitable art and craft niches of 2026 to see exactly where resin fits into the broader market. The key is to film the sparkling, fluid pouring process for social media; the sensory satisfaction of the pour is your best free advertisement.
Frequently Asked Questions
How do I make resin jewelry for the first time without any experience?
Start with a kit that includes epoxy resin, a silicone mold, and safety gear. Measure equal parts by volume, stir slowly for 3-4 minutes, pour into the mold, pop bubbles with a heat gun, and let it sit covered for 24 hours. Your first piece should be small, like a simple bezel pendant without any inclusions, so you can focus on the mixing technique.
What is the difference between UV resin and epoxy resin for jewelry making?
UV resin is a single-part formula that cures in minutes under a UV lamp or direct sunlight. It’s fantastic for small, thin applications like layering glitter in a shallow bezel. However, it’s expensive per ounce and can’t cure in thick layers. Two-part epoxy resin is cheaper, cures chemically through a reaction, and handles thick molds without warping, making it the better choice for pendants and 3D shapes.
Why did my resin jewelry turn out sticky or bendable after 24 hours?
Sticky or bendable resin almost always points to an incorrect mixing ratio, insufficient stirring, or a cold room. Scrape the sides of the cup religiously. If the piece is only slightly under-cured, you can sometimes salvage it by blowing a hot hairdryer over it for a few minutes to jumpstart the thermal reaction, but severely under-mixed pieces must be scrapped because the chemical structure hasn’t bonded correctly.
Can I add fresh flowers directly into my resin jewelry molds?
Absolutely not. Fresh flowers contain water. That moisture will leak into the resin, preventing proper polymerization and causing the petals to rot inside the clear piece, turning them brown and mushy. You must press and dry flowers completely for 2-4 weeks in a heavy book or use silica gel crystals to desiccate them thoroughly before embedding.
Is making resin jewelry safe to do inside an apartment without a dedicated studio?
Yes, but you must create a dedicated fume management system. Use a side room with a door that closes. Set a box fan in the window facing outward. Seal the window gap around the fan with cardboard, and place your work surface directly in front of the airflow. Always wear a proper organic vapor respirator. Nobody should enter the room during the 24-hour cure without ventilation running.
How much money does it actually take to start making resin jewelry?
A realistic starter budget in 2026 is between $40 and $70. This gets you 16 ounces of decent pouring epoxy, a respirator mask, a set of silicone molds, nitrile gloves, a few silicone measuring cups, and a basic jewelry finding kit. You can build from there as profits roll in, upgrading to a pressure pot for professional clarity only later.
If you’re ready to stop watching and start creating, there’s never been a better time. The materials are affordable, the community is supportive, and the results produce genuine artistic pride. Grab a simple mold, mix that first small cup, and experience the serene flow that comes from watching powder turn into glass. You’ll wonder why you waited so long.