easy thrift flips no sew: 10 Genius Upcycled Clothing Transformations Anyone Can Master in 2026

- easy thrift flips no sew: 10 Genius Upcycled Clothing Transformations Anyone Can Master in 2026
- 📋 Key Takeaways
- Table of Contents
- What Exactly Is a Thrift Flip (And Why Is Everyone Obsessed)?
- The Math That Makes Thrift Flipping Irresistible
- Why 2026 Is the Year of the No-Sew Revolution
- The Only Tools You Need for No-Sew Thrift Flips
- The Core No-Sew Toolkit (Under $15 Total)
- Wait—What About a Sewing Machine?
- The One Tool Worth Splurging On
- Best Fabrics for No-Sew Projects (And Which Ones Will Ruin Your Flip)
- Fabrics That Love No-Sew Techniques
- Fabrics to Avoid Like the Plague
- The Quick Fabric Test
- Thrift Store Treasure Hunting Strategy
- Flip #1: The 5-Minute T-Shirt Crop (Perfect for Beginners)
- What You Need
- Step-by-Step Instructions
- Variations to Try Once You Nail the Basic Crop
- Flip #2: Oversized Button-Down to Off-Shoulder Statement Top
- The Technique Explained
- Step-by-Step
- Why This Flip Works So Well
- Flip #3: Denim Jacket Makeover with Zero Stitching
- No-Sew Denim Customization Techniques
- Combining Techniques for Maximum Impact
- Flip #4: Maxi Dress to Flowy Midi Skirt in 10 Minutes
- How It Works
- The Step-by-Step Process
- The Bodycon Dress Variation
- What to Look for at the Thrift Store
- Flip #5: Chunky Sweater Refashion Using Only Knots
- The Front-Knot Cropped Sweater
- The Side-Knot Asymmetric Sweater
- The Woven-Back Detail Sweater
- What Makes Chunky Knits Special for No-Sew Work
- How to Turn Your Thrift Flips into Cash in 2026
- Where to Sell Your Thrift Flips
- Pricing Your Flipped Pieces
- Photography Tips That Sell
- The 7 Most Common No-Sew Thrift Flip Mistakes (And How to Avoid Them All)
- Mistake #1: Cutting Without Trying On First
- Mistake #2: Using Dull Scissors
- Mistake #3: Skipping the Wash Test
- Mistake #4: Choosing Fabrics That Fray
- Mistake #5: Overcomplicating Your First Flip
- Mistake #6: Ignoring the Original Garment's Structure
- Mistake #7: Buying Items You Don't Actually Like
- Frequently Asked Questions About Easy Thrift Flips No Sew
- What is the easiest thrift flip for a complete beginner with no sewing skills?
- Can no-sew clothing alterations actually survive washing machines?
- What should I look for at thrift stores for no-sew projects?
- Do I need expensive tools to start thrift flipping without sewing?
- Which fabrics should I absolutely avoid for no-sew clothing transformations?
- How much money can I realistically save by flipping thrifted clothes instead of buying new?
- Can I sell my no-sew thrift flips, or do buyers expect sewn construction?
- What if I mess up a cut—is the piece completely ruined?
- How long do no-sew alterations typically last compared to sewn ones?
- Where can I find inspiration for new no-sew thrift flip ideas?
- Your First Flip Starts Today
- 🔗 İlgili İçerikler
You know that feeling when you’re standing in a thrift store, holding a piece of clothing that’s almost perfect—but the fit is wrong, the hem is dated, or the silhouette just doesn’t work? Maybe you’ve put it back on the rack because you don’t own a sewing machine. Or the thought of threading a needle makes your eyes cross.
Here’s the truth I discovered after years of flipping thrifted finds: You don’t need to sew to create stunning, wearable clothing.
Last spring, I turned a $4 oversized men’s button-down into a chic off-shoulder top in under fifteen minutes—no needle, no thread, no machine. Just scissors and a few clever folding tricks. That single flip sparked an obsession that’s now saved me thousands of dollars and filled my closet with one-of-a-kind pieces nobody else owns.
The world of easy thrift flips no sew is exploding right now, and for good reason. According to ThredUp’s 2025 Resale Report, the secondhand apparel market is projected to reach $350 billion by 2028—and a massive chunk of those buyers are flipping their finds into custom creations (Source: ThredUp Annual Resale Report, 2025).
Whether you’re a broke college student, a sustainability warrior, or just someone who wants clothes that actually express who you are—this guide will walk you through 10 ridiculously simple transformations you can do tonight, with zero sewing skills required.
📋 Key Takeaways
- Master 10 no-sew thrift flip techniques that require only scissors, fabric glue, and basic household items
- Learn which fabrics work best (and which to avoid) for no-sew transformations
- Discover the exact tools and materials you need—starting under $15 total
- Get step-by-step instructions for the easiest beginner flip: the 5-minute t-shirt crop
- Find out how to turn thrift flipping into a profitable side hustle in 2026
- Understand the most common mistakes beginners make—and how to avoid every single one

Table of Contents
- What Exactly Is a Thrift Flip (And Why Is Everyone Obsessed)?
- The Only Tools You Need for No-Sew Thrift Flips
- Best Fabrics for No-Sew Projects (And Which Ones Will Ruin Your Flip)
- Flip #1: The 5-Minute T-Shirt Crop (Perfect for Beginners)
- Flip #2: Oversized Button-Down to Off-Shoulder Statement Top
- Flip #3: Denim Jacket Makeover with Zero Stitching
- Flip #4: Maxi Dress to Flowy Midi Skirt in 10 Minutes
- Flip #5: Chunky Sweater Refashion Using Only Knots
- How to Turn Your Thrift Flips into Cash in 2026
- Frequently Asked Questions About Easy Thrift Flips No Sew
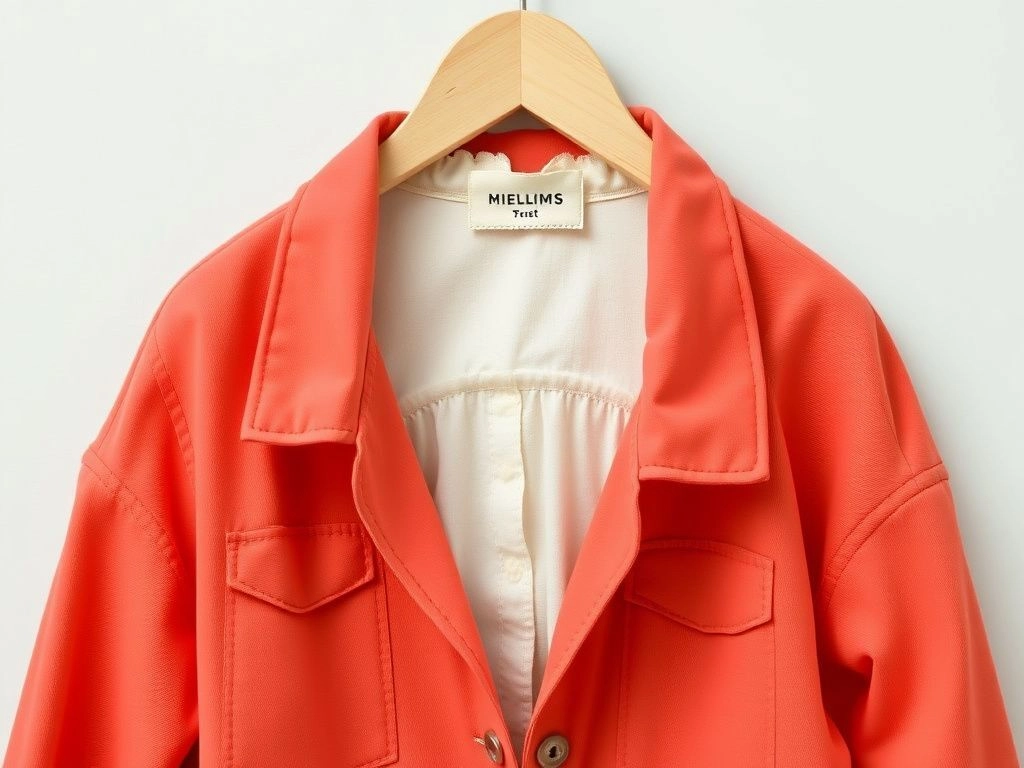
What Exactly Is a Thrift Flip (And Why Is Everyone Obsessed)?
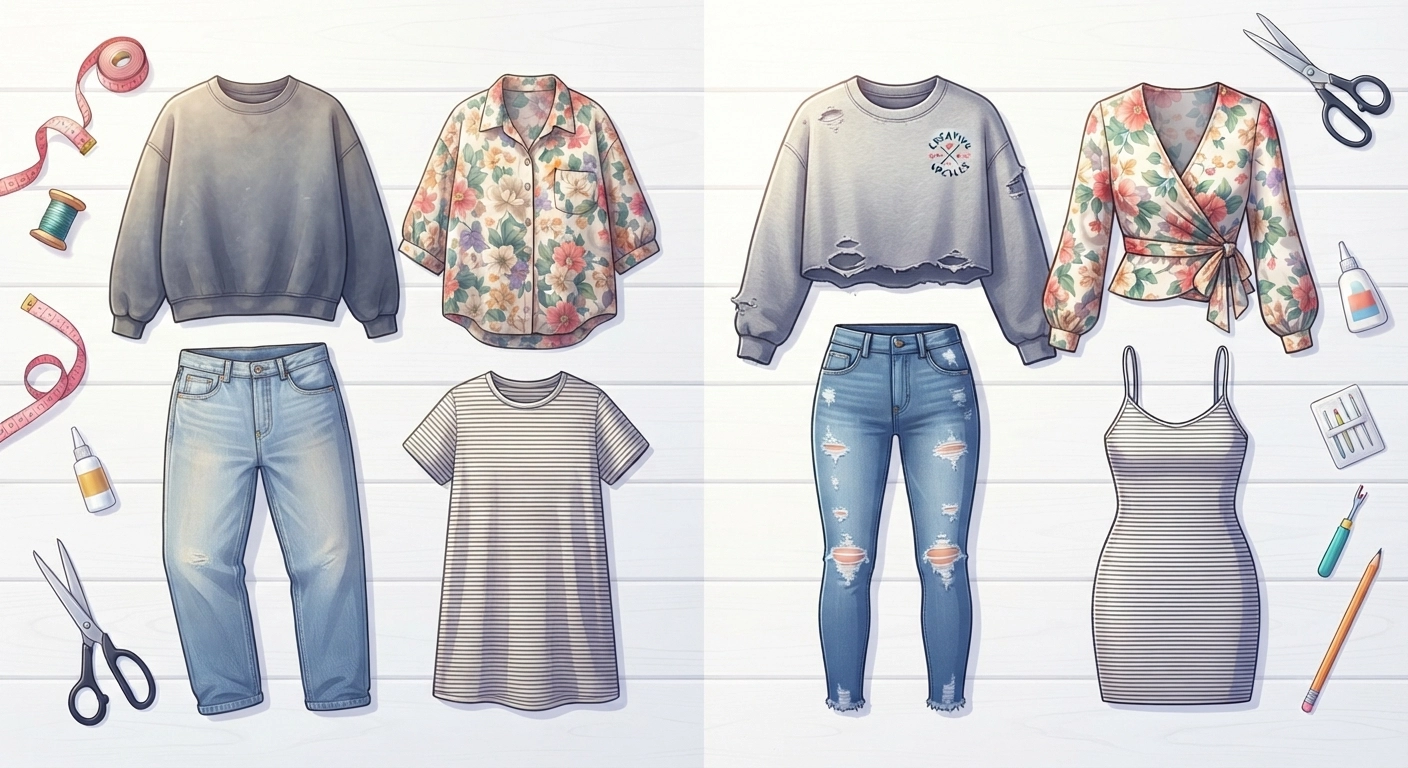
A thrift flip is exactly what it sounds like—you buy a secondhand clothing item (usually from a thrift store, garage sale, or flea market) and transform it into something completely new. The “flip” part means you’re changing the garment’s purpose, fit, or style without spending more than a few dollars.
Peki bu ne anlama geliyor?
You’re not just saving money. You’re participating in a massive cultural shift away from fast fashion. The average American throws away 81 pounds of clothing every single year (Source: Environmental Protection Agency, 2024). Every piece you flip is one less item in a landfill.
And here’s where easy thrift flips no sew specifically shine: They remove the single biggest barrier to entry. Most people think clothing alteration requires a sewing machine, formal training, or hours of patience. It absolutely doesn’t.
I’ve taught dozens of friends how to do their first flip, and the universal reaction is always the same: “Wait—that’s it? That took five minutes!”
The Math That Makes Thrift Flipping Irresistible
Let’s break down the numbers real quick. A new trendy top from Zara or H&M typically runs $35-50. A thrifted button-down? $3-7. Add $2 worth of fabric glue or hem tape, fifteen minutes of your time, and you’ve got a custom piece that literally nobody else owns.
Over the course of a year, the savings are staggering. If you flip just two items per month instead of buying new, you’re looking at approximately $800-1,000 in annual savings—and a wardrobe that actually reflects your personal style.
Why 2026 Is the Year of the No-Sew Revolution
Social media has supercharged this trend. On TikTok alone, the hashtag #thriftflip has accumulated over 8 billion views as of early 2026. Instagram Reels featuring no-sew transformations routinely pull millions of views within days.
But this isn’t just about viral content. The rising cost of living has pushed more people toward creative budgeting. When a gallon of milk costs $4.50 and rent keeps climbing, spending $60 on a single shirt feels—frankly—irresponsible.
Thrift flipping sits perfectly at the intersection of financial practicality and creative expression. It’s frugal, it’s fun, and the result is genuinely better than what you’d find on a retail rack.
The Only Tools You Need for No-Sew Thrift Flips
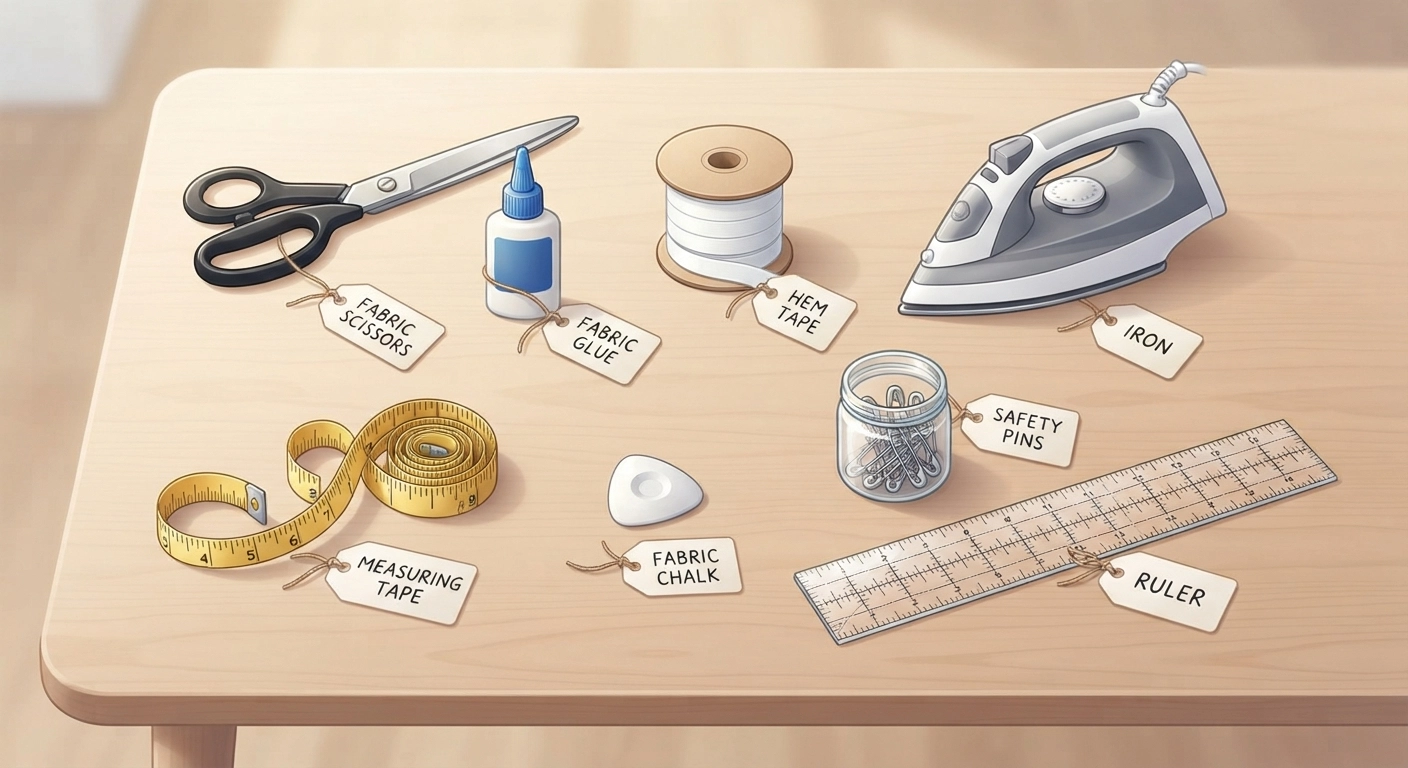
You don’t need a craft room full of supplies. You don’t need expensive equipment. You probably already own half of what’s on this list.
Here’s the beauty of easy thrift flips no sew: The barrier to entry is comically low. After testing dozens of methods over the years, I’ve narrowed it down to eight absolute essentials. Everything else is optional.
The Core No-Sew Toolkit (Under $15 Total)
| Tool | What It Does | Approx. Cost |
|---|---|---|
| Fabric Scissors | Sharp, dedicated scissors that cut fabric cleanly without fraying | $8-12 |
| Fabric Glue | Permanent, washable adhesive for hems and appliqués | $4-6 |
| Hem Tape / Fusible Web | Iron-activated bonding strips for invisible seams | $3-5 |
| Measuring Tape | Flexible ruler for marking cuts and folds | $2-4 |
| Chalk or Fabric Marker | Temporary marking that washes out | $2-3 |
| Iron | For hem tape activation and wrinkle removal | Already own |
| Safety Pins (Various Sizes) | Temporary holds, decorative elements, quick fixes | $2-3 |
| Ruler or Straight Edge | Clean, straight cutting lines | $1-2 |
Wait—What About a Sewing Machine?
İşin güzel tarafı şu: You genuinely don’t need one. Every single flip in this guide works without a single stitch. The techniques we’ll cover—cutting, gluing, knotting, folding, and using adhesive tapes—create finished pieces that are washable, wearable, and won’t fall apart after one use.
I have a sewing machine gathering dust in my closet. Haven’t touched it in two years. The no-sew methods are faster, more accessible, and honestly more fun because the results are instant.
The One Tool Worth Splurging On
If you invest in nothing else, buy good fabric scissors. Not kitchen scissors. Not the pair you use for paper. Dedicated fabric shears that cut through denim like butter.
Why? Because dull scissors create jagged edges that fray immediately. Clean cuts are the foundation of every successful flip in this guide. Expect to spend $10-15 on a decent pair—they’ll last years if you use them only for fabric.
Best Fabrics for No-Sew Projects (And Which Ones Will Ruin Your Flip)
Here’s something nobody tells you when you’re first starting with easy thrift flips no sew: Your fabric choice determines 80% of your success. Pick the wrong material and even the simplest crop top turns into a frayed, unwearable mess.
I learned this the hard way with a gorgeous silk blouse I found for $2. Cut it once, watched the edges unravel like a horror movie, and ended up with expensive-looking cleaning rags.
Fabrics That Love No-Sew Techniques
Cotton Jersey / T-Shirt Material: This is the holy grail for beginners. Jersey knit doesn’t fray when cut, it’s forgiving with glue, and it drapes beautifully. About 70% of the flips in this guide use cotton jersey as the base material.
Denim: Surprisingly no-sew friendly. Denim frays intentionally (distressed look!) and holds its shape well with fabric glue. The thickness actually helps—it doesn’t shift around while you’re working on it.
Chunky Knits and Sweater Material: Perfect for knot-based transformations. The loose weave makes it easy to thread pieces through each other, and the texture hides any imperfect cuts.
Fleece and Felt: These synthetic fabrics don’t fray at all. You can cut them into any shape with zero edge finishing required. Great for appliqués and patch details.
Fabrics to Avoid Like the Plague
Silk and Satin: Gorgeous to look at, nightmare to work with. They slip, slide, fray instantly, and fabric glue often stains or stiffens them in visible ways.
Linen: Beautifully sustainable but frays faster than almost anything else. Without a serger or rolled hem, your cuts will look ragged within hours.
Rayon and Viscose: These semi-synthetics are unpredictable. Some blends hold up okay; others dissolve into stringy messes the moment you cut them.
Leather and Suede (Real): Too thick for fabric glue, too expensive to risk ruining, and absolutely requires specialized tools.
The Quick Fabric Test
Peki bunun pratik karşılığı ne? When you’re standing in the thrift store, do this: Find an inside seam allowance (the extra fabric inside a hem). Pinch the edge and pull gently. If it frays immediately into loose threads, that fabric needs sewing. If it stays intact or only pills slightly, you’re golden.
This ten-second test has saved me from more bad purchases than I can count.
Thrift Store Treasure Hunting Strategy
Now that you know which fabrics work, here’s how to shop smart. Head straight to the men’s section first. Men’s shirts—especially cotton button-downs and oversized tees—are the single best source for no-sew flip material. They’re cheap (usually $2-5), made of durable cotton, and the oversized fit gives you plenty of fabric to work with.
The XL and XXL sections are gold mines. More fabric means more options for cutting, folding, and transforming.
Don’t overlook the pajama and loungewear sections either. Flannel pajama pants can become amazing patchwork pieces, and oversized sleep shirts often have beautiful prints that look incredible as crop tops or tanks.
If you’re thinking about monetizing this hobby, check out our guide on the most profitable DIY crafts to make and sell in 2026—thrift flipping ranks surprisingly high on the list.
Flip #1: The 5-Minute T-Shirt Crop (Perfect for Beginners)
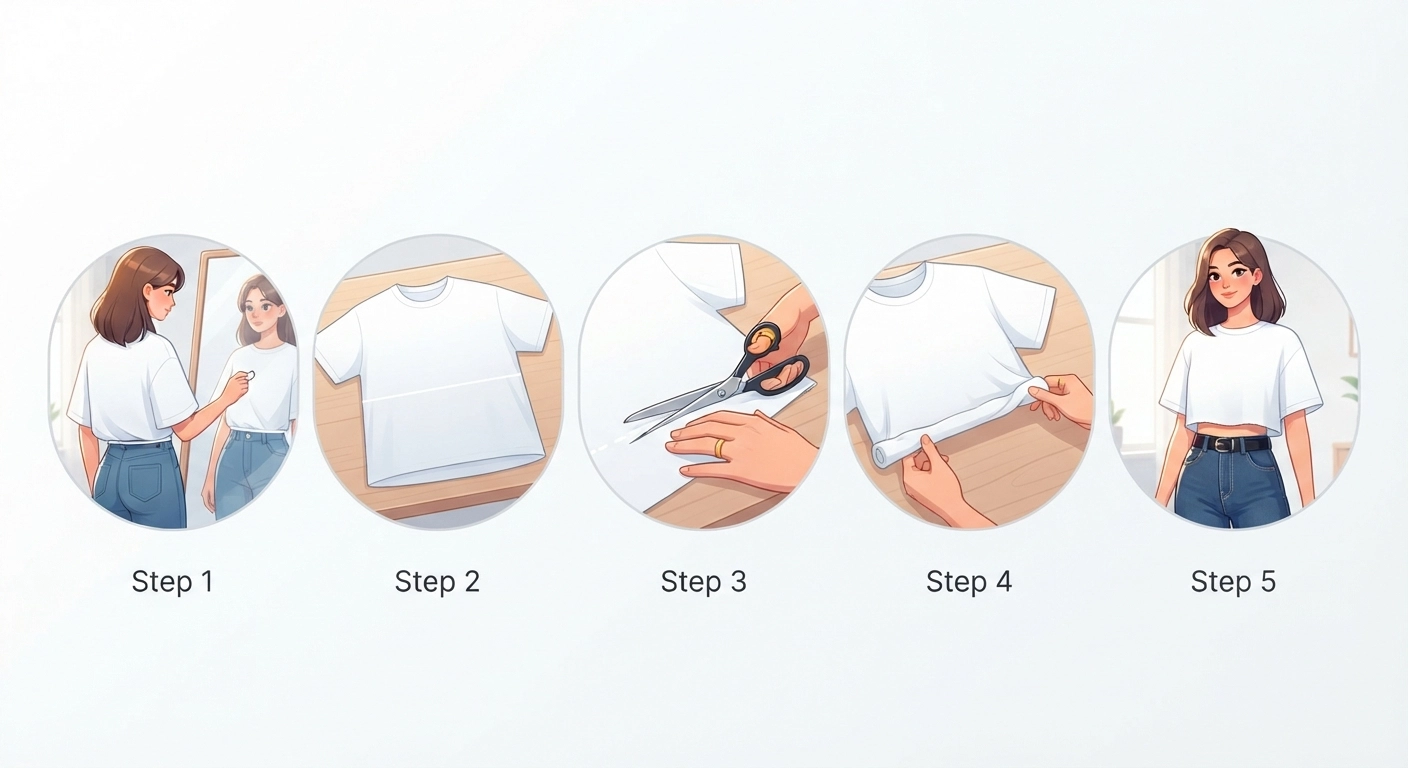
If you try exactly one flip from this entire guide, make it this one. The t-shirt crop is the gateway drug of easy thrift flips no sew—it’s virtually impossible to mess up, takes under five minutes, and the result looks like something you’d pay $40 for at Urban Outfitters.
Here’s the exact step-by-step process I’ve used on dozens of shirts:
What You Need
- 1 oversized t-shirt (men’s size L-XXL works best)
- Sharp fabric scissors
- Measuring tape (optional but helpful)
- Chalk or washable marker
Step-by-Step Instructions
Step 1: Try It On and Mark Your Length
Put the shirt on and stand in front of a mirror. Pinch the fabric at the point where you want the new hem to hit—usually just below your belly button for a classic crop, or at your natural waist for a more modest look. Mark that spot with chalk on both sides.
Step 2: Lay It Flat
Take the shirt off and lay it on a flat surface, smoothing out all wrinkles. The front and back should be perfectly aligned. If they’re not, your cut will be uneven—this is the most common beginner mistake.
Step 3: Draw Your Cut Line
Using your chalk marks as guides, draw a straight horizontal line across the entire width of the shirt. Use a ruler if you have one. The line should be completely parallel to the bottom hem.
Step 4: Cut with Confidence
Here’s where people hesitate. Don’t. One smooth, continuous cut produces a clean edge. Stopping and starting creates jagged lines. Grip your fabric scissors firmly and cut along your chalk line in one fluid motion.
Step 5: Stretch the Raw Edge
İşin sırrı şurada: After cutting, grab the new hem and gently stretch it. Cotton jersey naturally curls when stretched, creating a rolled edge that hides the cut line and looks intentionally distressed. This is the magic step that makes a DIY crop look professional instead of butchered.
Variations to Try Once You Nail the Basic Crop
The Knot Crop: Instead of cutting straight across, cut two slits up from the bottom hem (about 3 inches each) and tie the resulting flaps into a knot at the front. This creates a gathered, ruched effect that’s incredibly flattering.
The Fringe Crop: Cut your crop top normally, then snip vertical slits about 1 inch apart all along the bottom edge. Each slit should be about 2-3 inches deep. The result is a fringe hem that sways when you move and looks amazing layered over a tank top.
The Twist-Back Crop: Cut a deeper scoop out of the back of the shirt, leaving the front longer. Then take the excess fabric at the bottom back and twist it into a knot. This creates a gorgeous open-back detail that’s perfect for summer.
Flip #2: Oversized Button-Down to Off-Shoulder Statement Top
This is the flip that got me hooked. I found a men’s XL chambray button-down for $3.50 at Goodwill, spent fifteen minutes transforming it, and wore it to a dinner party that same evening where three different people asked me where I bought it.
The off-shoulder button-down flip looks impossibly chic and costs practically nothing. Even better? It works on literally any button-down shirt—chambray, cotton poplin, flannel, linen blends, you name it.
The Technique Explained
The concept is brilliantly simple: You’re essentially wearing the shirt backwards and using strategic button placement and folding to create an off-shoulder silhouette that stays in place without any sewing.
Step-by-Step
Step 1: Start with the Right Size
The shirt needs to be genuinely oversized. If it fits you normally when buttoned, it won’t work. You want at least 6-8 inches of extra fabric across the chest. XXL men’s shirts on a women’s size small-to-medium frame are ideal.
Step 2: Remove the Collar (Optional but Recommended)
Using your fabric scissors, carefully cut along the collar seam. Stay as close to the stitching as possible. Removing the stiff collar creates a softer neckline that drapes beautifully across the shoulders.
Step 3: Try It On Backwards
Put the shirt on backwards—buttons down your back, opening at the front. Don’t button it yet. Pull the shoulders down so the shirt sits just below your shoulders, creating that off-shoulder look.
Step 4: Cross the Front Panels
Take the two front panels (the parts that would normally button up your chest) and cross them over each other at your natural waist. The left panel goes over the right, or vice versa—whichever creates the smoothest drape.
Step 5: Secure with Fabric Glue
Mark where the panels overlap with chalk. Remove the shirt, apply a thin line of fabric glue along the overlap, and press firmly for 60 seconds. Let it dry completely (about 2 hours) before wearing.
Step 6: Add a Cinching Detail
The final touch that elevates this from “DIY experiment” to “designer lookalike”: Use a thin belt, a ribbon, or even a strip of fabric cut from the collar to cinch the waist. This creates an hourglass silhouette and keeps everything in place.
Why This Flip Works So Well
The secret is in the structural integrity of a button-down shirt. Unlike t-shirts, which are essentially shapeless tubes, button-downs have built-in seams, darts, and panels that create natural structure. When you wear it backwards, the back yoke (the panel across the shoulder blades) becomes a dramatic front neckline detail.
People pay $60-80 for off-shoulder tops at Reformation and Aritzia that use this exact construction. Yours cost $3 and fifteen minutes.
If you enjoy the precision work of marking and folding fabric for this flip, you might also love learning how to make easy resin jewelry for beginners—another craft that rewards attention to detail with stunning results.
Flip #3: Denim Jacket Makeover with Zero Stitching
Denim jackets are everywhere in thrift stores, typically priced between $5-10. They’re also the perfect canvas for no-sew experimentation because denim is forgiving, sturdy, and actually looks better with a little intentional wear and tear.
Here’s the reality: A plain blue denim jacket is fine. A customized denim jacket with patchwork, paint, and strategic distressing? That’s a statement piece that gets compliments every single time you wear it.
No-Sew Denim Customization Techniques
Technique 1: Fabric Paint Designs
This is the absolute easiest way to transform a denim jacket. Fabric paint pens or acrylic paint mixed with textile medium let you add designs, quotes, or abstract patterns directly onto the jacket. No cutting, no gluing—just paint, let dry, and heat-set with an iron.
Pro tip: Stencils are your best friend if freehand drawing makes you nervous. You can find affordable stencil packs at any craft store, or cut your own from cardstock.
Technique 2: Iron-On Patches
Iron-on patches have come a long way from the flimsy, peeling-off-after-one-wash versions of the ’90s. Modern iron-on patches use strong heat-activated adhesive that bonds permanently to denim.
Arrange your patches before ironing to create a balanced composition. The most popular placements are upper back (between the shoulder blades), chest pocket area, and sleeves. Use a pressing cloth between the iron and patch to prevent scorching.
Technique 3: Strategic Distressing
This technique requires nothing but sandpaper and patience. Lay the jacket flat and rub coarse-grit sandpaper (80-100 grit) along edges, seams, and anywhere natural wear would occur—collar, cuffs, pocket edges, hem.
The friction removes the top layer of indigo dye, revealing the lighter cotton underneath. This creates an authentic vintage fade that looks like you’ve owned the jacket for twenty years.
Technique 4: Safety Pin Embellishments
This sounds like a middle school craft project, but hear me out: Gold safety pins arranged in geometric patterns on a dark denim jacket look incredibly high-fashion. The key is arrangement—random pinning looks messy; deliberate rows or chevron patterns look intentional.
Thread small beads onto some of the safety pins for an extra level of detail. This is entirely removable, too, so you can change the design whenever you want.
Combining Techniques for Maximum Impact
The most stunning denim jacket flips I’ve seen combine 2-3 of these techniques. Imagine a jacket with a painted graphic on the back, a cluster of iron-on patches on one sleeve, and distressed edges all around. It looks like a $200 boutique piece.
The ThredUp 2025 report I mentioned earlier found that customized denim jackets resell for 3-5x the original thrift price on platforms like Depop and Poshmark. Which brings us to the money-making potential of this hobby.
Flip #4: Maxi Dress to Flowy Midi Skirt in 10 Minutes
Dated maxi dresses are the hidden gems of thrift stores. The print is usually gorgeous, the fabric is high-quality, but the silhouette screams “2012 bridal shower.” The fix is embarrassingly simple: Cut off the top.
This transformation takes a frumpy full-length dress and turns it into a chic midi skirt with an elastic waistband—and the best part is the waistband is already built in.
How It Works
Most maxi dresses with an elastic or drawstring waist have a seam where the bodice meets the skirt portion. You’re going to cut just above that seam, leaving the elastic waistband intact.
The Step-by-Step Process
Step 1: Identify the Waist Seam
Lay the dress flat and locate where the bodice (top part) attaches to the skirt (bottom part). There’s almost always a visible seam here, even on elastic-waist dresses.
Step 2: Cut Above the Seam
Using your fabric scissors, cut straight across the dress about half an inch above the waist seam. This leaves the entire elastic waistband attached to the skirt portion while removing the bodice entirely.
Step 3: Finish the Raw Edge
The only raw edge you’ve created is the inside of the waistband. Turn the skirt inside out and apply a thin line of fabric glue along the cut edge to prevent fraying. Let it dry completely.
Step 4: Try It On and Adjust Length
The newly created skirt might be longer than you want. Try it on, mark your preferred hem length with chalk, and cut accordingly. Remember—you can always cut more, but you can’t add fabric back. Start conservative.
The Bodycon Dress Variation
Aynı mantık, farklı sonuç: This same technique works on bodycon or fitted dresses, transforming them into pencil skirts. The key difference is the fabric type—bodycon material is usually a polyester-spandex blend that doesn’t fray, so you can skip the fabric glue step entirely.
What to Look for at the Thrift Store
The best candidates for this flip have:
- Clear elastic or drawstring waistbands
- Fabric with weight and drape (rayon, cotton blends, crepe)
- Prints or colors you genuinely love
- No damage or stains on the skirt portion
Avoid dresses where the bodice and skirt are a single continuous piece of fabric. The lack of a waist seam means you’ll lose the elastic, and suddenly you’re holding a tube of fabric with no way to keep it up.
If you find yourself accumulating more flipped pieces than you can wear, you might want to explore where to sell your DIY crafts in 2026—Etsy and Shopify each have distinct advantages for clothing sellers.
Flip #5: Chunky Sweater Refashion Using Only Knots
Chunky knit sweaters are thrift store staples, especially during spring cleaning season when people donate winter clothes by the bagful. The problem? Most of them are boxy, oversized, and about as flattering as wearing a blanket.
The solution is something I stumbled on by accident while trying to salvage a sweater my cat had snagged: Knotted sweater refashioning. No scissors required on this one—just your hands and a willingness to experiment.
The Front-Knot Cropped Sweater
This is the easiest sweater flip imaginable. Take an oversized chunky knit sweater, put it on, and gather all the excess fabric at the front. Twist it into a tight knot right at your natural waist. The knot itself becomes a decorative focal point, and the cropped silhouette completely transforms the shape of the sweater.
The beauty here is that it’s completely reversible. Unknot it and you have your original sweater back. Perfect for renters who can’t commit to permanent alterations, or for pieces you want to wear both ways.
The Side-Knot Asymmetric Sweater
A variation that looks even more intentional: Gather the excess fabric at one hip instead of the center front. This creates an asymmetric hemline that’s dramatically more interesting than a standard straight-across cut.
Loop the gathered fabric through itself twice (like tying a loose knot in a rope) and let the tail hang. The asymmetry draws the eye diagonally across the body, which is universally flattering regardless of body type.
The Woven-Back Detail Sweater
This one takes a bit more patience but produces stunning results. Cut thin strips from the bottom hem of the sweater (about 1/2 inch wide, 4-5 inches long). Then, cut small slits into the back of the sweater in a crosshatch pattern. Weave the strips through the slits to create a lattice or woven effect across the upper back.
Since chunky knits don’t fray, the cut edges stay clean. The woven detail adds visual interest to an otherwise plain back, and it’s entirely no-sew.
What Makes Chunky Knits Special for No-Sew Work
The loose, open structure of chunky knits is what makes them so cooperative. Unlike tightly woven fabrics where every cut frays instantly, chunky knits hold their shape because each stitch is essentially a small knot in the yarn.
This also means you can pull a single snagged thread and nothing unravels—the adjacent stitches keep everything locked in place. It’s the most forgiving fabric category for no-sew beginners.
For more inspiration on transforming everyday items into something beautiful with minimal effort, our guide to easy DIY room decor ideas for a minimalist aesthetic applies the same philosophy to home design.
How to Turn Your Thrift Flips into Cash in 2026
At some point, you’re going to end up with more flipped pieces than you can personally wear. It happens to everyone who gets into this hobby. The natural next step? Selling your creations.
The market for upcycled clothing is genuinely booming. Depop, the fashion-focused resale platform, reported that searches for “upcycled” and “thrift flip” increased by 340% between 2023 and 2025 (Source: Depop Annual Trend Report, 2025). Buyers are actively seeking out one-of-a-kind pieces, and they’re willing to pay premium prices for quality work.
Where to Sell Your Thrift Flips
Depop: The undisputed king of vintage and upcycled fashion resale. Depop’s user base skews young (Gen Z and younger Millennials), fashion-forward, and actively searches for unique pieces. The platform takes a 10% fee on each sale.
Poshmark: Better for higher-priced, more polished pieces. Poshmark users expect quality photography and detailed descriptions, but they also pay more. Fees are higher at 20% for sales over $15.
Etsy: If you’re producing flips in consistent styles or batches, Etsy positions you alongside other handmade and vintage sellers. The fee structure is more complex but the customer base is enormous and loyal.
Instagram + DM Sales: Many successful flippers bypass platforms entirely and sell directly through Instagram. Build an audience by posting before-and-after content, then sell via DMs and payment apps. Zero platform fees, but you handle everything yourself.
Pricing Your Flipped Pieces
Şöyle düşün: A buyer isn’t just paying for the garment. They’re paying for your creative vision, your labor, and the guarantee of a one-of-a-kind piece nobody else owns.
A good starting formula: (Thrift Cost × 3) + (Hours Spent × $15) = Base Price
So a jacket that cost $5 and took 1 hour to flip would be priced at ($15 + $15) = $30 minimum. Premium details (hand-painted elements, intricate patchwork, luxury brand base pieces) can justify prices of $60-100+.
Photography Tips That Sell
The number one factor in whether a flipped piece sells isn’t the quality of the flip—it’s the quality of the photos. Buyers can’t touch the fabric or try on the piece, so your photos need to do all the convincing.
Invest time in:
- Natural daylight (near a window or outside on an overcast day)
- Clean, uncluttered backgrounds
- Multiple angles (front, back, side, detail shots)
- Styled photos (the piece worn as part of a complete outfit)
- Before-and-after shots (buyers love seeing the transformation)
If you’re serious about building a side hustle from this, check out our comprehensive list of the 15 most profitable DIY crafts to make and sell in 2026—flipped clothing consistently ranks in the top three for profit margin.
For a deeper dive into choosing the right platform, our Etsy vs Shopify comparison for craft sellers breaks down the pros and cons in detail.
The 7 Most Common No-Sew Thrift Flip Mistakes (And How to Avoid Them All)
I’ve made every mistake on this list so you don’t have to. Some of them cost me time; a few of them cost me genuinely beautiful pieces I still mourn. Learn from my errors.
Mistake #1: Cutting Without Trying On First
The excitement of a new project makes you want to start cutting immediately. Resist this urge with everything you have. Always try the garment on, mark your cutting lines while wearing it, and visualize the final result before scissors touch fabric.
Fabric cut too short cannot be un-cut. I’ve lost at least three great shirts to premature scissor enthusiasm.
Mistake #2: Using Dull Scissors
We covered this earlier, but it bears repeating: Dull scissors destroy fabric. They create micro-tears along the cut line that blossom into full-blown fraying after one wash. Invest in sharp fabric shears and protect them from paper, cardboard, and anything that isn’t fabric.
Mistake #3: Skipping the Wash Test
Fabric glue and hem tape are washable—but only if they’re fully cured before hitting water. The curing time on most fabric glues is 24-48 hours for full bond strength. If you wash a glued piece the same day you made it, expect the seams to separate.
Mistake #4: Choosing Fabrics That Fray
We went deep on fabric selection earlier, but the short version: If you’re a beginner, stick to cotton jersey, denim, and chunky knits. Branch out to more challenging fabrics once you’ve built confidence.
Mistake #5: Overcomplicating Your First Flip
Your first flip should be the t-shirt crop. Not the off-shoulder button-down. Not the woven-back sweater. The five-minute crop that requires nothing but scissors and a t-shirt. Build momentum with an easy win.
Mistake #6: Ignoring the Original Garment’s Structure
The best flips work with the garment’s existing structure, not against it. Darts, seams, button plackets, and collars are features you can use creatively. Don’t fight them—leverage them.
Mistake #7: Buying Items You Don’t Actually Like
Just because something is cheap doesn’t mean you should buy it. If the print makes you cringe, or the fabric feels scratchy against your skin, walk away. You won’t magically love it after flipping. The best flips start with base pieces you’re genuinely excited about.
Frequently Asked Questions About Easy Thrift Flips No Sew
What is the easiest thrift flip for a complete beginner with no sewing skills?
The t-shirt crop is hands-down the easiest starting point. It requires only scissors and takes under five minutes. Cotton jersey (the standard t-shirt material) doesn’t fray, so there’s no edge-finishing required. The natural curl of the fabric creates a clean-looking hem automatically when you stretch it. Start with a cheap shirt you don’t care about, practice the cut, and you’ll have a wearable result on your very first try.
Can no-sew clothing alterations actually survive washing machines?
Yes—if you use the right materials and allow proper curing time. Fabric glue specifically labeled “washable” and “permanent” will hold through dozens of machine wash cycles when applied correctly. The critical step most beginners skip is curing time: let glued seams dry for at least 24 hours (48 is better) before the first wash. Hem tape bonded with an iron creates seams that are essentially permanent, as the adhesive melts into the fabric fibers.
What should I look for at thrift stores for no-sew projects?
Focus on three things: fabric type, size, and structural features. Look for cotton jersey, denim, chunky knits, and fleece—all no-sew friendly. Buy oversized (men’s XL-XXL gives you the most fabric to work with). Prioritize items with existing waistbands, button plackets, and seams you can use creatively. Avoid silk, linen, and rayon unless you’re prepared for fraying challenges. The men’s section, pajama section, and plus-size racks are consistently the best sources.
Do I need expensive tools to start thrift flipping without sewing?
Absolutely not. The complete starter toolkit costs under $15: fabric scissors ($8-12), fabric glue ($4-6), and hem tape ($3-5). You already own an iron and measuring tape. Safety pins cost pocket change. That’s genuinely everything you need to complete every flip in this guide. As your skills grow, you might add fabric paint, embellishments, and specialized adhesives—but the barrier to entry is remarkably low.
Which fabrics should I absolutely avoid for no-sew clothing transformations?
Silk, satin, linen, and pure rayon are the four fabrics that cause the most frustration for no-sew beginners. Silk and satin fray instantly when cut and show glue stains prominently. Linen frays faster than almost any other natural fiber. Rayon is unpredictable—some blends work, others dissolve into threads. Stick with cotton jersey, denim, chunky knits, and fleece for your first 5-10 projects before experimenting with trickier materials.
How much money can I realistically save by flipping thrifted clothes instead of buying new?
The average thrift flip costs $5-10 for the base garment plus $1-2 in materials. Comparable new pieces from mid-range retailers like Zara, H&M, or Urban Outfitters typically cost $35-60. If you flip two items per month instead of buying new equivalents, you’ll save approximately $800-1,000 annually. The savings compound dramatically if you flip more frequently or target higher-end comparisons—a flipped version of a $120 Anthropologie top costs the same $7 to create.
Can I sell my no-sew thrift flips, or do buyers expect sewn construction?
Buyers on platforms like Depop, Poshmark, and Etsy actively seek out upcycled and flipped clothing, including no-sew pieces. The key is transparency: clearly label your items as “no-sew” or “hand-cut” in the description. Many buyers actually prefer the unique aesthetic that no-sew techniques create—raw hems, knotted details, and fused seams have become desirable design features rather than signs of amateur work. Properly photographed and described no-sew flips consistently sell in the $25-60 range.
What if I mess up a cut—is the piece completely ruined?
Not necessarily. Many “mistakes” become happy accidents that lead to even more creative results. A crop top cut too short becomes a bralette layer piece. An uneven hem becomes intentional asymmetry. A frayed edge you didn’t expect becomes a distressed detail. The forgiving nature of no-sew fabrics means you usually have room to pivot. Only about 10% of “ruined” pieces are truly unsalvageable, and those were almost always silk or linen that should’ve been avoided in the first place.
How long do no-sew alterations typically last compared to sewn ones?
With proper materials and application, no-sew alterations can last for years. Hem tape bonds are frequently stronger than sewn seams on certain fabrics because the adhesive distributes tension across a wider area. Fabric glue seams on denim and cotton hold up comparably to stitching for 50+ wash cycles. The weak point in no-sew construction is usually at stress points—areas that experience constant pulling or stretching. Reinforce those areas with extra adhesive or an additional strip of hem tape.
Where can I find inspiration for new no-sew thrift flip ideas?
TikTok and Instagram Reels are the richest current sources—search #thriftflip, #nosew, and #upcycledfashion for an endless feed of tutorials. Pinterest boards organized by technique (knotted, cropped, painted) help you collect and categorize ideas. Thrift stores themselves are underrated inspiration sources—sometimes the garment itself suggests the transformation once you’re holding it. And don’t overlook fashion magazines and runway looks; many high-fashion details (asymmetric hems, deconstruction, raw edges) translate perfectly to no-sew techniques.
Your First Flip Starts Today
Here’s what I want you to do: Walk into the nearest thrift store this weekend. Head straight to the men’s t-shirt section. Find the most oversized, softest cotton tee you can—the uglier the print, the better, because flipping a ridiculous graphic tee into a chic crop top is the ultimate flex.
Grab some fabric scissors if you don’t already own a pair. Total investment: under $10, including the shirt.
Then follow the five-minute crop tutorial from Flip #1. That’s it. That’s your entry point into a hobby that will transform not just your wardrobe, but your relationship with clothing entirely.
There’s something deeply satisfying about wearing a piece you transformed with your own hands. Strangers compliment it. Friends ask where you bought it. And you get to smile and say, “I made it from a $3 thrift store find.”
The sustainability angle matters. The savings add up fast. But honestly? The real reason to start flipping is simpler than all of that: It’s genuinely, ridiculously fun.
Now go find something ugly and make it beautiful.
Ready for more DIY projects that combine creativity with practicality? Check out our guide to DIY crafts to make and sell for more profitable hobby ideas, or explore easy DIY room decor projects to bring the same transformation magic to your living space.